Sump Pump Installation in Basements: A Comprehensive Guide
Basement flooding is a significant concern for homeowners, potentially leading to structural damage, mold growth, and loss of personal belongings. A sump pump serves as a critical defense mechanism against this threat, actively removing accumulating water from beneath a building's foundation. This article provides a detailed examination of sump pump installation in basements, encompassing the preparation process, various installation methods, and essential considerations for ensuring optimal performance and longevity.
The necessity of a sump pump stems from several factors, including high water tables, poor drainage around the foundation, and heavy rainfall. When soil becomes saturated, hydrostatic pressure increases, forcing water through cracks and porous areas in the basement walls and floor. Without a sump pump, this water can accumulate, leading to flooding. A sump pump proactively removes this water, diverting it away from the foundation and preventing water damage.
Determining the Need for a Sump Pump
Assessing the need for a sump pump is the first crucial step. While a history of basement flooding is the most obvious indicator, other less apparent signs can also suggest the need for a sump pump installation. These include persistent dampness on basement floors or walls, visible water stains, and the presence of efflorescence (a white, powdery deposit that forms when water evaporates from concrete). If the home is located in an area with a high water table or experiences frequent heavy rainfall, a sump pump is generally advisable, even without a history of flooding.
A professional inspection by a qualified contractor can provide a more definitive assessment. The contractor will evaluate the surrounding soil conditions, drainage patterns, and the overall susceptibility of the basement to water intrusion. This evaluation will help determine the most appropriate type of sump pump and its optimal location within the basement.
Preparing for Sump Pump Installation
Prior to commencing the installation process, thorough preparation is essential. This involves gathering the necessary tools and materials, selecting the appropriate sump pump, and preparing the installation site. Failing to adequately prepare can lead to delays, complications, and potentially compromise the effectiveness of the sump pump system.
Tools and Materials: A standard sump pump installation requires a range of tools, including a hammer drill with a concrete coring bit (typically 18-24 inches in diameter), a shovel, a level, PVC piping, PVC primer and cement, electrical wiring (if needed), a check valve, and a discharge hose. The specific diameter of the PVC piping will depend on the sump pump's discharge outlet size.
Sump Pump Selection: Sump pumps are available in two primary types: submersible and pedestal. Submersible pumps are designed to be submerged in the sump pit, offering quieter operation and a longer lifespan. Pedestal pumps, on the other hand, are positioned outside the pit, with a hose extending into the water. Pedestal pumps are generally less expensive but can be noisier and less durable. The choice between these types depends on factors such as budget, noise sensitivity, and the frequency of pump operation.
The required horsepower (HP) rating of the sump pump is determined by the volume of water it needs to move and the vertical distance the water needs to be discharged (the "head"). A professional can calculate the necessary HP based on the basement's square footage, the local water table, and the discharge pipe's length and vertical rise. It's often better to err on the side of slightly higher HP than to undersize the pump.
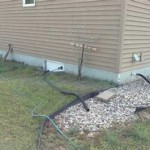
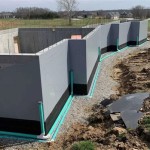
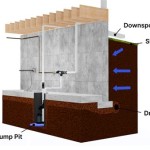
Site Preparation: The ideal location for the sump pit is typically the lowest point in the basement, where water naturally accumulates. This location is often along a basement wall. The area should be clear of obstructions and easily accessible for maintenance. Using the concrete coring bit, a hole is drilled through the basement floor to create the sump pit. The diameter of the hole should be slightly larger than the sump basin to allow for proper drainage around the basin.
Sump Basin Installation: A sump basin, typically made of plastic or concrete, is placed into the hole. The basin provides a contained space for the sump pump to operate and prevents debris from entering the pump. Ideally, the top of the sump basin should be flush with the basement floor. Gravel is then placed around the outside of the basin to facilitate drainage and prevent soil from collapsing into the pit. This gravel allows water to easily flow into the pit.
The Installation Process: Step-by-Step
The actual installation of the sump pump involves connecting the pump to the discharge piping, ensuring proper electrical connections, and testing the system's functionality. This process demands careful attention to detail to avoid leaks, electrical hazards, and operational malfunctions.
Connecting the Discharge Piping: The sump pump's discharge outlet is connected to PVC piping that will carry the water away from the foundation. A check valve is installed in the discharge line to prevent water from flowing back into the sump pit when the pump shuts off. Backflow can cause the pump to cycle unnecessarily and potentially damage the pump motor. The PVC piping is cut to the appropriate lengths and connected using PVC primer and cement, ensuring watertight seals at all joints. The discharge pipe should be sloped downward away from the house to allow for proper drainage.
Discharge Location: The discharge pipe must terminate at a location where the water will not flow back towards the foundation or cause problems for neighboring properties. Ideally, the water should be discharged into a storm sewer, a drainage ditch, or a designated area away from the house. Local building codes may regulate the allowable discharge locations, so it is important to comply with all applicable regulations.
Electrical Connections: Sump pumps typically require a dedicated electrical circuit with ground fault circuit interrupter (GFCI) protection. If an electrical outlet is not already available near the sump pit, a qualified electrician should install one. The sump pump is plugged into the GFCI outlet, ensuring a secure and weatherproof connection. It's highly recommended to have a professional electrician handle any electrical work to ensure safety and code compliance.
Testing: Once the plumbing and electrical connections are complete, the sump pump is tested to ensure proper operation. The sump pit is filled with water to activate the pump's float switch. The pump should turn on automatically and effectively remove the water from the pit. Observe the discharge flow to ensure that the water is being discharged properly and that there are no leaks in the piping. Repeat this test several times to confirm the system's reliability.
Alternative Sump Pump Systems
While the standard sump pump installation described above is the most common, alternative systems exist to address specific needs and situations. These include backup sump pumps and alarm systems, which provide added protection in the event of power outages or pump failures. Understanding these alternatives can help homeowners make informed decisions about their basement water management strategies.
Backup Sump Pumps: Power outages are a common cause of sump pump failure. A backup sump pump, powered by a battery or a water-powered system, provides a secondary line of defense in such situations. Battery-powered backup pumps activate automatically when the primary pump fails due to a power outage. Water-powered backup pumps use municipal water pressure to operate, but they can be expensive to operate due to the water usage.
Alarm Systems: Sump pump alarm systems detect high water levels in the sump pit and alert the homeowner. These alarms can be visual (flashing lights) or audible (sounding an alarm). Some alarm systems can even send notifications to a smartphone or other mobile device. An alarm system can provide early warning of a pump failure or a high water table, allowing the homeowner to take corrective action before flooding occurs.
Maintenance and Long-Term Considerations
Regular maintenance is crucial for ensuring the long-term performance and lifespan of a sump pump. Neglecting maintenance can lead to pump failures, reduced efficiency, and costly repairs. Simple preventative measures can significantly extend the life of the sump pump and protect the basement from water damage.
Regular Inspection: The sump pump should be inspected regularly, at least twice a year, to check for any signs of wear or damage. This includes inspecting the pump motor, the float switch, the discharge piping, and the sump pit itself. Remove any debris that may have accumulated in the pit, such as leaves, dirt, or gravel. Ensure the float switch moves freely and is not obstructed.
Testing: Periodically test the sump pump by filling the sump pit with water to activate the pump. Observe the pump's operation to ensure it is functioning properly. Listen for any unusual noises, such as grinding or squealing, which may indicate a problem with the pump motor. Check the discharge flow to ensure it is consistent and unobstructed.
Cleaning: The sump pump should be cleaned periodically to remove any sediment or debris that may have accumulated in the pump housing. Refer to the manufacturer's instructions for specific cleaning procedures. Generally, this involves disconnecting the pump from the power supply, removing it from the sump pit, and rinsing it with clean water.
Professional Servicing: It is recommended to have the sump pump professionally serviced every few years. A qualified technician can perform a more thorough inspection of the pump, including checking the motor windings, the impeller, and the seals. The technician can also lubricate the pump's moving parts and replace any worn components.
By understanding the installation process, considering alternative systems, and implementing a regular maintenance schedule, homeowners can effectively protect their basements from water damage and ensure the long-term reliability of their sump pump systems. This proactive approach minimizes the risk of costly repairs and provides peace of mind during periods of heavy rainfall or high water tables.

What Is A Sump Pump Peel Pumps Explain It Or Sell And Install Them

Diy Sump Pump Install Your Own Smd Fluid Controls

Sump Pump Installation In Connecticut Installing A System Stamford Norwalk West Hartford Ct

Sump Pump Installation In Pa De Dry Tech Waterproofing Solutions

Basement Sump Pump Sedona Waterproofing Solutions

Sump Pump Installs In Portland Bangor Rochester Maine Six Steps To Installing A System Me

Diy Sump Pump Install Your Own Smd Fluid Controls

Permanent Fixes For Damp Basements Diy

What Is A Sump Pump How It Works Water Guard Plumbing

How Much Does Sump Pump Installation Cost 2024 Guide Forbes Home
Related Posts