How to Repair a Crumbling Basement Wall
A crumbling basement wall is a serious issue that can compromise the structural integrity of a building. Identifying the cause of the damage is critical before attempting any repair. Addressing the underlying problem will prevent recurring issues and ensure the longevity of the repair. Ignoring the presence of a compromised basement wall can result in more extensive and costly repairs down the line. This article explains the process of repairing a crumbling basement wall, offering guidance on diagnosing the cause and outlining the steps involved in restoration.
Diagnosing the Cause of the Deterioration
Before initiating any repair work, it is essential to accurately identify the cause of the crumbling wall. Common causes include hydrostatic pressure, efflorescence, and foundation settlement. A thorough inspection is needed to determine the primary factors contributing to the deterioration.
Hydrostatic Pressure: This is a significant contributor to basement wall damage. It arises when water builds up in the soil surrounding the foundation. The pressure exerted by the water can force its way through the concrete or masonry, leading to cracking and crumbling. Poor drainage, inadequate grading, and overflowing gutters are common causes of hydrostatic pressure. Signs indicative of hydrostatic pressure include horizontal cracking, inward bowing of the wall, and dampness on the interior surface.
Efflorescence: This is the white, powdery substance that appears on the surface of concrete or masonry walls. It is caused by water dissolving salts within the wall material and depositing them on the surface as the water evaporates. While efflorescence itself isn't structurally damaging, it indicates the presence of moisture within the wall, which can lead to more significant problems like freeze-thaw damage, where the water trapped within the wall expands and contracts as it freezes and thaws, causing the material to break down.
Foundation Settlement: Uneven settling of the foundation can cause significant stress on basement walls. This settlement can be due to various factors, including unstable soil, inadequate soil compaction during construction, or changes in soil moisture content. Signs of foundation settlement include diagonal cracks, stair-step cracks, and doors or windows that stick or are difficult to open and close. It is crucial to consult with a structural engineer to assess the extent of the settlement and devise a suitable repair plan.
Freeze-Thaw Cycles: In colder climates, repeated freezing and thawing of water trapped within the masonry or concrete can lead to significant damage. As water freezes, it expands, creating pressure within the material. Over time, this repeated expansion and contraction can cause the material to crack and crumble. Signs of freeze-thaw damage include scaling, spalling, and surface flaking.
Lack of Waterproofing: Inadequate or deteriorated exterior waterproofing can allow water to penetrate the basement walls. This water can then contribute to hydrostatic pressure, efflorescence, and freeze-thaw damage, accelerating the deterioration of the wall. Assessing the condition of the exterior waterproofing is an important step in diagnosing the cause of a crumbling basement wall.
Preparing for the Repair
Once the cause of the damage has been identified, the next step is to prepare the area for repair. This involves gathering the necessary tools and materials and taking steps to protect the surrounding area. Proper preparation will ensure a more efficient and effective repair process.
Safety Precautions: Before starting any repair work, it is crucial to prioritize safety. Wear appropriate safety gear, including eye protection, gloves, and a dust mask. Ensure adequate ventilation in the basement to avoid inhaling dust or fumes. If dealing with mold, wear a respirator to prevent respiratory irritation. Disconnect any electrical circuits in the immediate work area to avoid the risk of electric shock.
Tools and Materials: The specific tools and materials needed will depend on the type and extent of the damage. However, some common tools and materials include: a cold chisel, a hammer, a wire brush, a masonry trowel, a mixing tub, a bucket, a sponge, a pressure washer, hydraulic cement, patching mortar, concrete bonding agent, and waterproofing sealant. It may also be necessary to rent or purchase concrete forms if larger sections of the wall need to be rebuilt.
Cleaning the Area: Thoroughly clean the area to be repaired. Remove any loose or crumbling material using a cold chisel and hammer. Use a wire brush to remove any remaining debris or efflorescence. A pressure washer can be used to clean the area more effectively. Ensure the surface is clean and free of any contaminants that could interfere with the bonding of the repair materials.
Protecting the Surroundings: Cover any nearby surfaces or objects that could be damaged by the repair work. Use plastic sheeting to protect the floor and furniture. Tape off any areas that you don't want to get dust or debris on. This will minimize the cleanup required after the repair is completed.
Executing the Repair
With the preparation complete, proceed with the repair. The specific repair method will depend on the nature and extent of the damage. However, several common repair techniques can be used to address crumbling basement walls.
Repairing Minor Cracks and Crumbling: For small cracks and areas of crumbling, patching mortar can be used. First, apply a concrete bonding agent to the cleaned surface to improve adhesion. Mix the patching mortar according to the manufacturer's instructions. Use a masonry trowel to apply the mortar to the damaged area, pressing it firmly into the cracks and crevices. Smooth the surface of the mortar to match the surrounding wall. Allow the mortar to cure according to the manufacturer's instructions. Keep the repaired area damp during the curing process to prevent cracking.
Using Hydraulic Cement for Active Leaks: Hydraulic cement is a fast-setting cement that is ideal for stopping active water leaks. Clean the area around the leak and widen the crack slightly with a chisel. Mix the hydraulic cement according to the manufacturer's instructions. Form the cement into a ball and press it firmly into the crack, holding it in place until it sets. Hydraulic cement typically sets within a few minutes, effectively stopping the water leak.
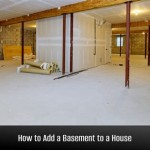
Rebuilding Larger Sections of the Wall: If larger sections of the wall are severely damaged or crumbling, it may be necessary to rebuild them. This is a more involved process that requires more extensive preparation. First, shore up the wall to prevent it from collapsing. Consult with a structural engineer to determine the appropriate shoring method. Remove the damaged section of the wall. Construct concrete forms to match the dimensions of the removed section. Mix new concrete according to the manufacturer's instructions and pour it into the forms. Vibrate the concrete to remove any air pockets. Allow the concrete to cure for several days before removing the forms. Keep the concrete damp during the curing process to prevent cracking.
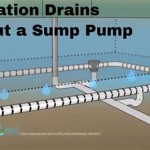
Addressing Hydrostatic Pressure: If hydrostatic pressure is the primary cause of the crumbling wall, it is essential to address the source of the pressure. This may involve improving drainage around the foundation by installing French drains or extending downspouts away from the foundation. Regrading the soil around the foundation can also help to divert water away from the walls. In some cases, it may be necessary to install a sump pump to remove excess water from around the foundation.
Applying Waterproofing Sealant: Once the repairs are complete, apply a waterproofing sealant to the exterior of the basement wall. This will help to prevent water from penetrating the wall and causing future damage. Choose a sealant that is specifically designed for use on concrete or masonry. Apply the sealant according to the manufacturer's instructions. Ensure that the entire wall surface is covered, paying particular attention to cracks and joints.
Monitoring and Maintenance: After completing the repairs, it is important to monitor the wall for any signs of recurring damage. Check for cracks, efflorescence, and dampness. Address any new issues promptly to prevent them from becoming more serious. Regularly inspect and maintain the drainage system around the foundation to ensure that it is functioning properly. By taking these steps, it will help extend lifespan of the repairs and prevent future basement wall problems.

Rebuilding Crumbling Basement Wall

How To Best Fix Crumbling Basement Walls Diy Home Improvement Forum

Basement Walls Crumbling Fine Homebuilding

Crumbling Concrete Basement Walls Doityourself Com Community Forums

Saving Crumbling Walls New Pour Vs Shotcrete News And Events For Ayers Basement Systems

Crumbling Concrete Basement Walls Doityourself Com Community Forums

How Do I Make My Basement Walls Nice Hometalk

Foundation Repair Restoring Dangerous Crumbling Walls With Shotcrete In Grand Rapids Mi

How To Repair Your Concrete Foundation That S Crumbling

Fixing The Retaining Wall Part 2 Diy Dad 8 Youtube
Related Posts