How To Lay Carpet On Concrete Basement Floor
Laying carpet on a concrete basement floor can transform a cold, utilitarian space into a warm, inviting living area. Concrete, while durable, is often cold and prone to moisture issues, making it unsuitable as a finished flooring surface on its own. Carpeting offers significant benefits including increased comfort, improved insulation, and noise reduction. However, proper preparation and installation techniques are crucial to ensure the longevity and performance of the carpet and to prevent moisture-related problems like mold and mildew.
This article provides a comprehensive guide on how to lay carpet on a concrete basement floor, covering essential steps from assessing the concrete slab to selecting appropriate materials and executing the installation itself. A systematic approach, coupled with an understanding of the challenges inherent in basement environments, will enable homeowners and contractors to achieve a professional and long-lasting result.
Assessing the Concrete Slab and Addressing Moisture Issues
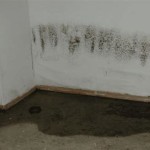
Before beginning any carpet installation, a thorough assessment of the concrete slab is paramount. The primary concern is the presence of moisture. Concrete is porous and can draw moisture from the ground through capillary action. This moisture can damage the carpet, promote mold growth, and compromise the adhesive used for installation. A moisture test is therefore an indispensable first step.
Several methods exist for testing moisture levels. A simple plastic sheet test involves taping a square of clear plastic sheeting (approximately 18x18 inches) to the concrete floor in several locations, securing all edges with duct tape. Leave the plastic in place for 24-72 hours. After the waiting period, inspect the underside of the plastic. If condensation is present, or the concrete underneath appears darker than the surrounding area, it indicates excessive moisture. This test provides a basic indication but isn't quantitatively precise. A more accurate method involves using a calcium chloride test kit, which measures the moisture vapor emission rate (MVER) in pounds per 1000 square feet over 24 hours. The acceptable MVER for carpet installation typically depends on the carpet manufacturer's recommendations and the type of adhesive used. Generally, an MVER of 3 pounds or less is considered acceptable for most carpet installations. Readings above this require mitigation strategies.
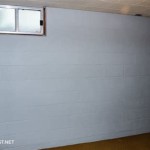
If moisture is detected, several solutions can be employed. A vapor barrier, typically a polyethylene film at least 6 mil thick, is essential. This barrier is installed directly over the concrete slab, acting as a physical barrier to prevent moisture from migrating upward. Overlapping seams should be sealed with moisture-resistant tape. For more severe moisture problems, applying a liquid epoxy moisture barrier coating may be necessary. These coatings create a waterproof membrane over the concrete surface. Follow the manufacturer's instructions carefully during application to ensure proper adhesion and effectiveness.
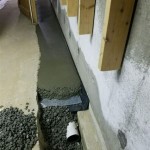
In addition to moisture testing, the slab should be inspected for cracks, unevenness, and debris. Cracks should be filled with a concrete patching compound to create a smooth and uniform surface. Larger cracks may require a more robust repair method, such as applying self-leveling concrete. Any debris, such as paint splatters, glue residue, or dirt, must be removed by scraping, sanding, or using a concrete cleaner. A clean, level, and moisture-resistant substrate is essential for a successful carpet installation.
Selecting Appropriate Materials: Carpet, Padding, and Adhesive
Choosing the right materials is critical for the long-term performance and comfort of the carpet installation. The selection process involves considering the basement environment, the intended use of the space, and budget constraints.
Carpet selection should prioritize moisture resistance and durability. Synthetic fibers, such as nylon, polypropylene (olefin), and polyester, are generally preferred over natural fibers like wool. Nylon is highly durable and stain-resistant, making it a good choice for high-traffic areas. Polypropylene is exceptionally resistant to moisture and mold, making it an excellent option for damp basements. Polyester is a budget-friendly alternative that offers good stain resistance but may be less durable than nylon.
Carpet padding, also known as underlayment, plays a crucial role in cushioning, insulation, and noise reduction. It also prolongs the life of the carpet by absorbing impact and reducing wear. For basements, a closed-cell foam padding is recommended. Closed-cell foam is impervious to moisture, preventing mold and mildew growth. Avoid using fiber padding or felt padding, as these materials are highly absorbent and can trap moisture, leading to problems. The thickness of the padding will affect the carpet's feel and performance. A thicker padding provides more cushioning but can also make the carpet more difficult to install and can contribute to instability on stairs. Consult with a flooring professional to determine the appropriate padding thickness for the chosen carpet and application.
The adhesive used to secure the carpet to the concrete floor is another critical consideration. Select an adhesive specifically formulated for concrete substrates and designed for use in damp environments. Moisture-resistant adhesives are available that can withstand elevated moisture levels without losing their bonding strength. Consider using a low-VOC (volatile organic compound) adhesive to minimize indoor air pollution. Follow the adhesive manufacturer's instructions carefully regarding application methods, drying times, and safety precautions. Proper ventilation is essential during and after adhesive application.
In addition to carpet, padding, and adhesive, other necessary materials include carpet tack strips, seam tape, a carpet knife, a knee kicker, a carpet stretcher, and a vacuum cleaner. Carpet tack strips are secured around the perimeter of the room to anchor the carpet and provide a smooth, taut finish. Seam tape is used to join carpet sections together, creating a seamless appearance. A carpet knife is essential for cutting the carpet to size and trimming excess material. A knee kicker and carpet stretcher are used to stretch the carpet tightly over the tack strips, ensuring a wrinkle-free installation.
Executing the Installation: Step-by-Step Guide
Once the concrete slab is prepared, and the appropriate materials are selected, the carpet installation can begin. A systematic approach is crucial for achieving a professional and long-lasting result.
First, install the carpet tack strips around the perimeter of the room, approximately ½ inch from the wall. Secure the tack strips to the concrete floor using concrete nails or adhesive. Ensure that the tacks are facing toward the wall. Accurate placement of the tack strips is essential for proper carpet stretching. Next, lay the carpet padding over the vapor barrier, ensuring that it covers the entire floor area. Overlap the seams of the padding and tape them together to prevent shifting. Trim the padding to fit snugly against the tack strips.
Unroll the carpet in the room, allowing for sufficient overlap at the walls. Align the carpet seams according to the room dimensions and the carpet pattern. Use a carpet knife to trim the carpet to the approximate size, leaving several inches of excess material around the perimeter. Carefully join the carpet seams using seam tape, following the manufacturer's instructions. Ensure that the seam is flat and smooth to prevent visible lines and unevenness.
Using a knee kicker, hook the edge of the carpet onto the tack strips at one corner of the room. Apply firm, even pressure with your knee to stretch the carpet over the tack strips. Work your way around the perimeter of the room, stretching the carpet gradually and evenly. Use a carpet stretcher to stretch larger areas of the carpet, ensuring a tight and wrinkle-free installation. The carpet stretcher should be positioned several feet from the wall and used to apply tension in the direction of the tack strips. Overlap each stretch slightly to eliminate any slack in the carpet.
Once the carpet is securely attached to the tack strips around the perimeter of the room, use a carpet knife to trim the excess material along the walls. Tuck the trimmed edges of the carpet between the tack strips and the baseboard or wall. Use a stair tool or a blunt chisel to ensure a clean and finished edge. Finally, vacuum the carpet thoroughly to remove any loose fibers or debris. Pay particular attention to the seams and edges of the carpet.
Proper ventilation is essential throughout the installation process, especially during adhesive application. Open windows and doors to allow fresh air to circulate. Wear appropriate safety gear, including gloves, eye protection, and a dust mask. Follow all manufacturer's instructions carefully regarding the use of adhesives, seam tape, and other materials. With careful planning and execution, laying carpet on a concrete basement floor can create a comfortable and attractive living space.

How To Carpet A Basement Floor Diy Family Handyman

How To Install Carpet On Concrete

Installing Peel And Stick Carpet Tiles On Concrete Diy Exquisitely Unremarkable

How To Lay Carpet On Concrete The Main Stages

Carpet Installation Over Concrete In A Basement Youtube

Carpet In Basements The Issues Solutions And Alternatives Greenbuildingadvisor

How To Install Carpet On Concrete Basement With S Installation Floors

Installing Peel And Stick Carpet Tiles On Concrete Diy Exquisitely Unremarkable

Basement Sub Floor Matting Options In Portland Bangor Rochester Maine Subfloor Systems Installed Me

Subfloor Options For Basements Hgtv
Related Posts