How to Lay Carpet on a Concrete Basement Floor
Laying carpet on a concrete basement floor can transform a cold, utilitarian space into a warm, inviting area suitable for living, working, or recreation. Concrete, however, presents unique challenges compared to wood subfloors, primarily related to moisture management. Improper preparation and installation can lead to mold growth, carpet degradation, and discomfort. This article details the steps involved in successfully installing carpet on a concrete basement floor, emphasizing the importance of preparation and proper materials.
The success of a carpet installation on concrete hinges on addressing three core considerations: moisture mitigation, subfloor preparation, and proper installation techniques. Ignoring any of these aspects can compromise the longevity and overall quality of the finished product. Thorough planning and execution are essential for a durable and aesthetically pleasing result.
1. Assessing and Mitigating Moisture
Concrete is porous and can wick moisture from the ground. Basements are particularly susceptible to moisture issues due to their location below ground level. Before initiating any carpet installation, rigorously assess the moisture levels within the concrete slab. Several methods can be employed for this assessment.
A simple starting point is a visual inspection. Look for signs of water damage, such as discoloration, efflorescence (a white, powdery deposit on the surface), or dampness. These are evident indicators of a moisture problem.
More precise measurements can be obtained using a concrete moisture meter. These devices provide a numerical reading of the moisture content within the concrete. The acceptable moisture level for carpet installation depends on the type of carpet, padding, and adhesive being used. Consult manufacturer specifications for recommended moisture limits.
Another common method is the calcium chloride test (also known as the moisture vapor emission rate or MVER test). This involves placing a measured amount of calcium chloride under a sealed dome on the concrete surface for a specific period. The calcium chloride absorbs moisture emitted from the concrete. By weighing the calcium chloride before and after the test, one can calculate the amount of moisture emitted over a 24-hour period. This rate, measured in pounds per 1,000 square feet per 24 hours, indicates the moisture vapor emission rate. Again, consult carpet and adhesive manufacturers for acceptable MVER limits.
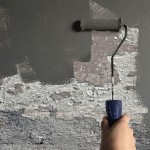
If moisture levels exceed acceptable limits, mitigation strategies are crucial. Several options are available, depending on the severity of the problem. One common approach is to apply a concrete sealer or moisture barrier specifically designed for basement floors. These products create a waterproof or vapor-retardant layer that prevents moisture from migrating through the concrete and into the carpet.
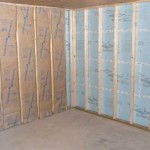
Another option is to install a subfloor system that incorporates an air gap between the concrete and the carpet. These systems typically consist of interlocking plastic tiles or dimpled membranes that allow for air circulation, promoting evaporation and preventing moisture buildup. These subfloor systems also offer added insulation and a smoother surface for carpet installation.
Addressing exterior drainage problems is also critical to mitigating moisture. Ensure that gutters and downspouts are properly directing water away from the foundation. Grading the soil around the foundation to slope away from the building can also help to prevent water from pooling and seeping into the basement.
Failure to adequately address moisture issues will inevitably lead to problems down the line. Mold growth, carpet delamination, unpleasant odors, and structural damage are all potential consequences of neglecting moisture control.
2. Preparing the Concrete Subfloor
Once moisture concerns have been addressed, the next step is to prepare the concrete subfloor to ensure a smooth, clean, and level surface for carpet installation. This involves cleaning, repairing imperfections, and potentially leveling the floor.
Begin by thoroughly cleaning the concrete floor. Remove any debris, dust, dirt, paint splatters, or adhesive residue. This can be accomplished using a combination of sweeping, vacuuming, and scrubbing. For stubborn residue, consider using a concrete cleaner or degreaser specifically designed for this purpose. Follow the manufacturer's instructions carefully and ensure adequate ventilation.
After cleaning, inspect the concrete for cracks, holes, or unevenness. Small cracks can often be filled with a concrete crack filler or patching compound. Larger cracks may require more extensive repair, potentially involving the use of a concrete saw and patching material. Consult with a concrete specialist for advice on repairing significant structural cracks.
For uneven floors, a self-leveling compound can be used to create a smooth, even surface. This compound is typically a cement-based mixture that is poured onto the floor and allowed to flow and self-level. Before applying the self-leveling compound, ensure that the floor is properly primed to promote adhesion. Follow the manufacturer's instructions carefully for mixing and application.
Grinding down high spots in the concrete can also contribute to a level surface. This process requires specialized equipment and safety gear and should be performed by someone experienced in concrete work. It is important to consider the potential impact on the structural integrity of the floor before grinding down any concrete.
After any repairs or leveling, it is crucial to re-clean the floor to remove any dust or debris generated during the process. A clean, smooth, and level surface is essential for ensuring proper adhesion of the carpet and padding.
3. Installing Carpet and Padding
With the moisture issues addressed and the subfloor properly prepared, the final step is to install the carpet and padding. Selecting the right materials and using proper installation techniques are crucial for a successful outcome.
Choose a carpet and padding suitable for basement environments. Look for moisture-resistant materials that are less susceptible to mold and mildew growth. Synthetic fibers, such as nylon and polypropylene, are generally preferred over natural fibers like wool. Consider a closed-cell foam padding, which is less absorbent than open-cell foam. Check the manufacturer's specifications for recommended padding thickness and density.
Before installing the carpet, install tack strips around the perimeter of the room, leaving a gap of approximately one-third of an inch between the tack strip and the wall. The tack strips provide a secure anchor for the carpet and allow it to be stretched properly.
Next, install the padding over the prepared concrete subfloor. Secure the padding to the floor using an adhesive recommended for concrete. Seam the padding sections together using duct tape to create a continuous surface. Ensure that the padding is smooth and free of wrinkles or bubbles.
Carefully measure and cut the carpet to fit the room, allowing for extra material to be trimmed after installation. Position the carpet in the room, aligning it with the tack strips. Use a knee kicker to stretch the carpet onto the tack strips, working from the center of the room outwards. A power stretcher may be necessary for larger rooms or thicker carpets to ensure proper tension.
Once the carpet is securely attached to the tack strips, trim off any excess material along the walls using a carpet knife. Tuck the edges of the carpet neatly into the gap between the tack strips and the wall using a stair tool or tucking tool. This creates a clean, finished edge.
For seams in the carpet, use a seam roller to press the edges together and create a tight, invisible seam. Apply seam sealing tape underneath the seam to prevent fraying and separation.
After the carpet is installed, thoroughly vacuum the entire surface to remove any loose fibers or debris. Inspect the installation for any imperfections and make any necessary adjustments.
Proper ventilation is crucial, particularly in the initial days following installation. This aids in the curing of any adhesives used and helps to dissipate any lingering odors. Consider using fans to promote air circulation.
Adhering to these guidelines and investing in quality materials will maximize the chances of a long-lasting and comfortable carpet installation on a concrete basement floor. Regular maintenance, including vacuuming and professional cleaning, will further extend the life of the carpet and maintain its appearance.

How To Carpet A Basement Floor Diy Family Handyman

Installing Peel And Stick Carpet Tiles On Concrete Diy Exquisitely Unremarkable

How To Install Carpet On Concrete

Installing Peel And Stick Carpet Tiles On Concrete Diy Exquisitely Unremarkable

Basement Sub Floor Matting Options In Portland Bangor Rochester Maine Subfloor Systems Installed Me

Carpet In Basements The Issues Solutions And Alternatives Greenbuildingadvisor

Basement Modular Carpet Tiles With A Raised Lock Together Base

How To Install Carpet Tiles Without Glue

Basement Carpeting Tiles Total Finishing

Subfloor Options For Basements Hgtv
Related Posts