How to Install an Interior Basement Drainage System
A properly installed interior basement drainage system can be an effective solution for managing moisture and preventing water damage. This system utilizes a network of drainage channels, sump pump, and discharge piping to collect and remove water that seeps into the basement. While installing a basement drainage system requires some skill and knowledge, it is a project that many DIY-minded homeowners can undertake. Here's a comprehensive guide on how to install an interior basement drainage system.
Assessing the Basement and Planning the System
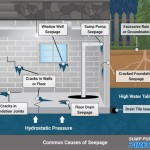
Before starting the installation, a thorough assessment of the basement is crucial. This involves identifying the source of water infiltration, the severity of the problem, and the potential pathways for water to enter. The following steps are essential in planning the system:
1.
Identify the source of water:
This might involve checking for cracks in the foundation walls, leaky pipes, or poor grading around the house, which can direct water towards the basement. 2.Determine the scope of the problem:
This involves assessing the amount of water that enters the basement, the frequency of infiltration, and the impact on the basement space. 3.Plan the drainage system:
Based on the assessment, a detailed plan for the drainage system should be created, including the location of the drainage channels, the sump pit, and the discharge piping. 4.Choose materials and tools:
Selecting the appropriate materials and tools is essential for a successful installation. These include drainage channels, gravel, sump pump, discharge piping, and sealants.Installing the Drainage Channels and Sump Pit
The installation process begins with excavating the area where the drainage channels will be installed. The channels are typically placed along the foundation walls, where water is most likely to seep in. The following steps guide the installation:
1.
Excavate the trenches:
Dig trenches along the foundation walls, about 6 inches deep and 6-8 inches wide. The trenches should slope gently towards the sump pit. 2.Install the drainage channels:
Place the drainage channels in the trenches, ensuring they are properly aligned and securely fastened. The channels should be connected to the sump pit using a suitable coupling. 3.Install the sump pit:
The sump pit is a cylindrical tank that collects the water drained from the channels. It is typically placed in the lowest point of the basement floor, where the drainage channels converge. The sump pit should be located in an accessible area for maintenance and pumping. 4.Fill the trenches with gravel:
Once the drainage channels and sump pit are in place, fill the trenches with gravel. This provides a porous medium for the water to travel through. 5.Seal the trenches:
Seal the trenches with a waterproof sealant to prevent water from seeping into the surrounding concrete. Ensure the sealant is compatible with the basement floor material.Installing the Sump Pump and Discharge Piping
The sump pump is the heart of the drainage system, responsible for removing water from the sump pit and discharging it outside the house. The following steps outline the installation:
1.
Install the sump pump:
The sump pump is placed inside the sump pit. Ensure the pump is properly secured and connected to a power source. 2.Connect the discharge piping:
The discharge piping connects the sump pump to the exterior drain. The piping should be installed with a slight upward pitch to prevent water from flowing back into the basement. 3.Route the discharge piping:
Route the discharge piping through the basement wall and connect it to an exterior drain, such as a storm sewer or a dry well. 4.Test the sump pump:
After installation, test the sump pump by filling the sump pit with water. Ensure that the pump properly removes the water and discharges it outside the basement.By following these steps, homeowners can successfully install an interior basement drainage system that helps combat moisture problems and protect their basements from water damage. It is important to note that this guide is intended to provide general information. Always consult with a qualified professional for specific advice on installing a drainage system in your basement.

Basement Drains 101 A Simple Guide For Busy Homeowners

Drain Pipe Installation Install A Warranted Basement System In Your Home

Interior Drainage System Structural Inspections Internachi Forum

Interior Basement Drainage In Pennsylvania Drain System Installed Along The Perimeter Pa

Basement Waterproofing How To Install A Water Drainage System Diy

Drain Tile System Installation Drainage Culvert Pipe French Catch Basin Covers

Footing Drain Interior French Pros And Cons Sani Tred

Basement Drainage System Interior And Exterior Waterproofing Free Estimates

Remedial Drainage Options Waterproof Magazine

Baseboard Basement Drain Pipe System In Connecticut Homes French Company