How To Install a French Drain In Your Basement Floor
Basement water intrusion is a common problem for homeowners. It can lead to mold growth, structural damage, and a generally unpleasant living environment. While there are various approaches to mitigating basement moisture, a French drain installed in the basement floor can be a highly effective solution, especially when groundwater pressure is the primary cause of dampness. This article details the process of installing a French drain system within a basement floor, providing a comprehensive guide for experienced DIYers and contractors. Before undertaking this project, it is crucial to assess the specific drainage needs of the basement and consult with a qualified professional if necessary.
Understanding the Function of a French Drain in a Basement
A French drain, also known as a weeping tile system, operates on the principle of gravity and permeability. When installed beneath the basement floor, it acts as a channel to collect water that seeps up through the concrete slab or leaks in through the walls. The water then flows along the channel to a sump pit, where a sump pump discharges it away from the foundation. This system effectively intercepts groundwater before it can accumulate and cause significant water damage. The core components of a French drain system include a perforated pipe, gravel, filter fabric, and a sump pit with a sump pump. The system is designed to direct water away from the foundation, preserving the structural integrity and air quality of the basement.
The efficacy of a French drain depends on several factors, including the gradient of the drain, the permeability of the surrounding soil, and the capacity of the sump pump. Proper planning and installation are essential for ensuring that the system functions as intended and provides long-term protection against water damage. It is equally critical to determine the correct location of the drain and the sump pit, considering the topography of the surrounding land and the points of water entry.
Preparation and Planning Before Installation
Before commencing the physical installation, a thorough assessment of the basement’s moisture problem is required. This involves identifying the sources of water intrusion, determining the extent of the problem, and evaluating the existing drainage infrastructure. The assessment should also include a review of local building codes and regulations, as permits may be required for altering the basement floor. Homeowners should also contact utility companies to locate underground lines and prevent accidental damage during excavation.
Accurate measurements are crucial for determining the length of the drainpipe required and the optimal location for the sump pit. The slope of the floor and the natural drainage patterns of the surrounding land should also influence the placement of the drain. Typically, the drain should run along the perimeter of the basement floor, adjacent to the walls, as this is where water infiltration often occurs. The sump pit should be situated in the lowest part of the basement to facilitate efficient water collection. It is imperative to develop a detailed plan that includes these factors before any physical work starts to minimize errors and ensure the system works optimally.
Safety is paramount when working with concrete and power tools. Appropriate protective gear, including safety glasses, gloves, and a dust mask, should be worn at all times. The work area should also be properly ventilated to prevent the buildup of dust and fumes. It is advisable to have a helper present to assist with heavy lifting and other tasks. Finally, familiarity with the operation of the tools and equipment that are needed is required. Concrete saws, jackhammers, and shovels should be used with care and according to the manufacturer's instructions.
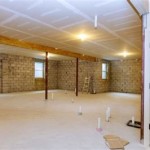
Step-by-Step Installation Process
The installation of a French drain in a basement floor involves several stages, starting with concrete cutting and excavation, followed by drainpipe placement, gravel backfilling, filter fabric installation, and finally, sump pump installation and testing. Each stage requires careful execution and attention to detail to achieve a successful outcome.
1. Cutting the Concrete:
The first step is to cut a trench along the perimeter of the basement floor, typically about 12 inches away from the walls. A concrete saw specifically designed for cutting concrete should be used for this purpose. The depth of the trench should be at least 12 inches to accommodate the drainpipe and a layer of gravel. It is crucial to make clean, straight cuts to ensure a professional finish. Dust control measures, such as using a water-cooled saw or a vacuum system, are important to minimize airborne particles. Proper ventilation is also essential. The width of the trench should be sufficient to accommodate the drainpipe and surrounding gravel, usually around 6 to 8 inches.
2. Excavation:
After cutting the concrete, the next step is to excavate the trench to the desired depth. A jackhammer may be necessary to break up the concrete within the trench, especially if the slab is thick. Shovels and buckets can then be used to remove the broken concrete and soil. Ensure the trench has a slight slope (about 1/8 inch per foot) towards the sump pit to promote water flow. The excavated material should be disposed of properly, in accordance with local regulations. The trench should be free of debris and loose soil before the next stage of the installation.
3. Drainpipe Installation:
Once the trench is prepared, a perforated drainpipe is laid along the bottom. Typically, a 4-inch diameter PVC pipe with perforations is used. The perforations should face downwards to allow water to enter the pipe from below. The pipe should be connected to the sump pit using appropriate fittings. The pipe should be level and free of obstructions to ensure proper water flow. It is also advisable to wrap the drainpipe with filter fabric to prevent soil and debris from entering and clogging the pipe.
4. Gravel Backfilling:
Next, the trench is backfilled with gravel. The gravel should be clean and graded, typically ranging in size from 3/4 inch to 1 inch. The gravel provides a porous medium for water to flow through and helps to filter out debris. The gravel should be filled to a level slightly below the top of the existing concrete slab, allowing space for a layer of concrete to be poured later. The gravel should be compacted to provide a stable base for the new concrete. It's recommended to use a tamper to compact the gravel.
5. Filter Fabric Installation:
A layer of filter fabric is placed over the gravel to prevent soil and debris from entering the gravel and clogging the drainpipe. The filter fabric should be a non-woven geotextile fabric specifically designed for French drain applications. The fabric should be overlapped at the seams to create a continuous barrier. The filter fabric should extend up the sides of the trench to prevent soil from entering from the sides.
6. Replacing the Concrete:
The final step in the trench preparation is to pour a new layer of concrete to restore the basement floor. The concrete should be mixed according to the manufacturer's instructions and poured into the trench, level with the existing slab. The concrete should be finished smoothly to create a seamless transition. Allow the concrete to cure properly before putting any weight on it. Depending on the type of concrete used, this curing period can range from a few days to a week or more.
Sump Pump Installation and System Testing
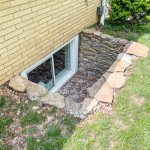
The sump pit should be installed in the designated location, preferably in the lowest point of the basement. The sump pit should be large enough to accommodate the sump pump and provide adequate water storage capacity. A sump pump with sufficient capacity should be selected based on the expected water flow rate. The sump pump should be installed according to the manufacturer's instructions. The discharge pipe from the sump pump should be routed away from the foundation to prevent water from re-entering the basement.
Once the sump pump is installed, the system should be tested to ensure proper operation. This can be done by pouring water into the drain and observing the sump pump's response. Make sure that the pump activates when the water level rises and effectively discharges the water away from the foundation. Check for any leaks or malfunctions in the system. The system should be monitored periodically, especially during periods of heavy rainfall, to ensure that it is functioning as intended.
Maintenance and Long-Term Performance
Regular maintenance is essential for ensuring the long-term performance of the French drain system. This includes inspecting the sump pump, cleaning the sump pit, and checking for any signs of clogging or damage to the drainpipe. The sump pump should be inspected regularly to ensure that it is functioning properly. The sump pit should be cleaned periodically to remove any sediment or debris that may have accumulated. The drainpipe can be cleaned by flushing it with water or using a drain snake. It is also advisable to periodically inspect the surrounding soil for signs of erosion or settlement.
By following these steps, homeowners can effectively install a French drain in their basement floor and protect their homes from water damage. Remember to prioritize safety, plan carefully, and maintain the system regularly. While this guide provides a comprehensive overview, consulting with a professional is always recommended, especially for complex or challenging situations.

Basement Drainage Drying A Wet Diy Family Handyman

A Quick Guide To French Drain Basement Waterproofing

Thin Floor French Drain System In Philadelphia Baltimore Ellicott City Pa De And Md Installation Pennsylvania Delaware Maryland

Basement Sump Pump French Drain Installation Basements Love Us

French Drain Installation Norwalk Stamford West Hartford Waterguard Sub Floor System In Connecticut

French Drain Products In Greater Clearfield Contractors Altoona State College Bellefonte Du Bois Saint Marys Pa

Dealing With Basement Water From The Inside Greenbuildingadvisor

Basement Drain Tile And French Drains Explained Jes Foundation Repair

French Drain Vs Waterguard Interior Drainage System

Installing French Drains In A Basement D Bug Waterproofing
Related Posts