How To Install a Drop Ceiling Around Basement Windows
Installing a drop ceiling in a basement is a common home improvement project that can significantly enhance the space's aesthetics, acoustics, and insulation. However, integrating a drop ceiling around basement windows presents unique challenges. This article provides a comprehensive guide on how to effectively install a drop ceiling while accommodating these window structures, ensuring a professional and aesthetically pleasing outcome.
Before commencing any installation, meticulous planning is crucial. This involves accurately measuring the basement area, including windows, and determining the desired height of the drop ceiling. The height should be low enough to conceal ductwork, pipes, and wiring but high enough to maintain comfortable headroom. Local building codes should be consulted to ensure compliance with minimum ceiling height requirements. Furthermore, the location of existing utilities, such as electrical boxes and plumbing, must be carefully mapped out to avoid interference during the installation process.
Materials needed for the project include: drop ceiling grid components (main runners, cross tees, wall angles), ceiling tiles, fasteners (screws, anchors), leveling tools (laser level, spirit level), measuring tape, cutting tools (tin snips, utility knife), safety glasses, gloves, and potentially shims or furring strips for leveling purposes. The selection of ceiling tiles should be based on factors such as moisture resistance (especially important in basements), sound absorption, and aesthetic preferences.
Key Point 1: Framing Around Basement Windows
The primary challenge in installing a drop ceiling around basement windows is creating a seamless transition. The frame around the window needs to accommodate the grid system while maintaining accessibility to the window itself. This often involves constructing a custom frame using the same materials as the drop ceiling grid or suitable alternatives such as wood furring strips.
The initial step is to install the wall angle around the perimeter of the room, ensuring it is level and securely fastened to the wall. This serves as the foundation for the drop ceiling grid. When approaching a window, the wall angle should be carefully measured and cut to fit snugly against the window frame. It is important to leave a small gap (approximately ¼ inch) to allow for expansion and contraction due to temperature and humidity changes. This gap can be filled with caulk post-installation for a neater appearance.
Next, a header piece must be constructed that spans the width of the window opening. This header will support the main runners of the drop ceiling grid. The header can be made from a section of wall angle, securely fastened to the adjacent wall angles. Alternatively, a custom-built frame using wood furring strips can provide a more robust and adaptable solution. The wood frame should be treated with a sealant to resist moisture damage, a common concern in basement environments.
The depth of the window frame needs to be considered. If the window is recessed, the drop ceiling grid can be installed flush with the wall, and the window opening will naturally extend beyond the ceiling. If the window protrudes, the framing around the window will need to be built out to match the level of the window. This can be achieved using furring strips or additional sections of wall angle.
The critical aspect of framing around the window is maintaining a level and consistent surface. This is achieved using leveling tools and making precise measurements. Any discrepancies in level can result in an uneven ceiling and an unprofessional aesthetic. Shims can be used to fine-tune the level of the frame before final fastening.
Once the header and any necessary build-outs are in place, the installation of the main runners and cross tees can proceed, ensuring they are properly connected to the header frame. Cut the ceiling grid components with tin snips, taking care to create clean and accurate cuts. Use safety glasses and gloves during the cutting process.
When attaching the grid components to the window frame, ensure that the fasteners used are appropriate for the material. Screws with anchors are typically suitable for securing the grid to concrete or masonry walls. Wood screws are used for fastening to furring strips. Drill pilot holes before inserting screws to prevent splitting the wood or damaging the wall.
The final step in framing around the windows is to ensure the installation doesn't impede window operation. The ceiling grid should not interfere with the opening or closing of the window. Furthermore, accessibility to the window for cleaning and maintenance should be maintained. This might require designing the drop ceiling around the window with removable sections.
Key Point 2: Considerations for Utility Access and Lighting
Basements often house various utilities, including electrical wiring, plumbing, and HVAC ductwork. These utilities must be accessible for maintenance and repairs even after the drop ceiling is installed. Similarly, careful consideration must be given to lighting fixtures to ensure adequate illumination of the basement space.
Before installing the drop ceiling, meticulously document the location of all utilities. Take photographs and create diagrams showing the precise placement of wiring, pipes, and ductwork. This documentation will be invaluable for future maintenance or renovations.
When planning the drop ceiling layout, incorporate access panels strategically located near critical utilities. These access panels can be standard-sized ceiling tiles that are easily removed and replaced. The location and size of the access panels should be carefully considered to provide sufficient access to the utilities without compromising the structural integrity of the drop ceiling.
For electrical wiring, ensure that all connections are properly housed in junction boxes and that the wiring is secured to the ceiling joists or other structural elements. The wiring should not rest directly on the drop ceiling grid or tiles. Use cable ties or other appropriate fasteners to keep the wiring organized and out of the way.
Plumbing pipes should be insulated to prevent condensation and dripping onto the drop ceiling tiles. Dripping water can cause staining and damage to the tiles, potentially leading to mold growth. Pipe insulation also helps to reduce noise from water flowing through the pipes.
HVAC ductwork should be positioned above the drop ceiling grid, allowing for adequate airflow throughout the basement. Registers and diffusers can be installed in the ceiling tiles to provide ventilation. Ensure that the registers are sized appropriately for the space to maintain proper air circulation. Flexible ductwork can be used to connect the registers to the main duct lines.
Lighting is a crucial aspect of basement finishing. Recessed lighting fixtures, also known as can lights, are a popular choice for drop ceilings. These fixtures are installed within the ceiling grid and provide even illumination throughout the room. It is essential to select lighting fixtures that are compatible with the drop ceiling grid and tiles. The weight of the fixtures should be supported by the grid, and the wiring should be properly connected and grounded.
The placement of lighting fixtures should be carefully planned to provide adequate illumination without creating glare or shadows. Consider the size and shape of the room, as well as the location of furniture and other objects. Dimmable lighting can be used to adjust the brightness of the lights to suit different activities and moods.
LED lighting is an energy-efficient and long-lasting option for basement lighting. LED fixtures consume less electricity than traditional incandescent or fluorescent lights and have a longer lifespan, reducing the need for frequent replacements.
Key Point 3: Ensuring a Clean and Professional Finish
The final stage of the drop ceiling installation focuses on achieving a clean and professional finish. This involves carefully installing the ceiling tiles, addressing any gaps or inconsistencies, and cleaning up the work area.
Before installing the ceiling tiles, inspect the grid system to ensure that it is level and securely fastened. Any adjustments to the grid should be made at this stage. Check that all the main runners and cross tees are properly connected and that the wall angles are securely attached to the wall.
Carefully lift each ceiling tile into place, tilting it slightly to fit it through the grid opening. Gently lower the tile onto the grid, ensuring that it is properly seated. Avoid forcing the tiles, as this can damage them or the grid system.
When installing the tiles around the window frame, precise cuts may be necessary to fit the tiles snugly against the frame. Use a utility knife to make clean and accurate cuts. Take measurements carefully and mark the cutting lines on the tile before cutting. Wear safety glasses to protect your eyes from debris.
If any gaps are present between the ceiling tiles and the window frame, they can be filled with caulk. Use a paintable caulk that matches the color of the ceiling tiles. Apply the caulk in a thin, even bead and smooth it out with your finger or a caulk smoothing tool.
Inspect the entire drop ceiling for any inconsistencies or imperfections. Check that all the tiles are level and properly seated. Address any sagging or uneven tiles by adjusting the grid system or replacing the tiles.
Clean up the work area thoroughly. Remove all debris, including scraps of ceiling tiles, grid components, and fasteners. Sweep or vacuum the floor to remove dust and dirt. Wipe down the ceiling tiles with a damp cloth to remove any fingerprints or smudges.
Consider adding trim or molding around the window frame to conceal any gaps or imperfections and to create a more finished look. The trim can be painted or stained to match the window frame or the ceiling tiles.
Proper ventilation is essential for preventing moisture buildup and mold growth in the basement. Ensure that the basement is adequately ventilated by installing exhaust fans or opening windows regularly. Dehumidifiers can also be used to control humidity levels.
By following these detailed instructions, homeowners can successfully install a drop ceiling around basement windows, creating a functional, aesthetically pleasing, and valuable addition to their home. The meticulous planning, careful execution, and attention to detail are crucial for achieving a professional and long-lasting result.

How To Install A Suspended Ceiling Building Window Wells Slopes Youtube

Window Well Slopes Showroom Basement Slope S How To Build Drop Ceiling Building A Suspended Strictly Ceilings Racine Wisconsin

How To Build A Drop Ceiling Window Well Slope Ceilings Installation

Window Well Slopes Showroom Basement Slope S How To Build Drop Ceiling Building A Suspended Strictly Ceilings Racine Wisconsin

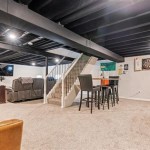
Install Drop Ceiling Modern Basement Philadelphia By Ah Contracting Llc Houzz Ie

Window Well Slopes Showroom Basement Slope S How To Build Drop Ceiling Building A Suspended Strictly Ceilings Racine Wisconsin

How To Install A Suspended Ceiling Building Window Wells Slopes Youtube

Window Well Slopes Showroom Basement Slope S How To Build Drop Ceiling Building A Suspended Strictly Ceilings Racine Wisconsin

Pic Of Clever Drop Ceiling Solution Fine Homebuilding

Pic Of Clever Drop Ceiling Solution Fine Homebuilding
Related Posts