How To Install Basement Window Well Covers
Basement window well covers offer a multitude of benefits, including enhanced safety, protection from the elements, and improved energy efficiency. Installing them can seem daunting, but with careful planning and execution, it's a manageable DIY project. This article provides a comprehensive guide to installing basement window well covers, ensuring a successful and long-lasting outcome.
Before embarking on the installation process, it is crucial to understand the different types of window well covers available. These commonly include: plastic, metal grating, and polycarbonate covers. Plastic covers are generally the most economical option, offering basic protection from debris and light rain. Metal grating covers are more robust, capable of withstanding heavier loads and offering increased security. Polycarbonate covers are a premium option, known for their durability, transparency, and ability to insulate the window well.
The selection of the appropriate cover depends on individual needs and budget. Factors to consider include the size and shape of the window well, the local climate, and the desired level of protection and security. Once the correct type of cover has been chosen, the installation process can begin.
Measuring the Window Well
Accurate measurements are essential for a successful installation. Incorrect measurements can lead to a cover that does not fit properly, rendering it ineffective. The following steps outline the proper procedure for measuring a window well:
First, measure the width of the window well. This measurement should be taken at the widest point of the well opening, from the outside edge of one side wall to the outside edge of the opposite side wall. It's important to take multiple measurements along the width to account for any irregularities or variations in the well's shape. Record the largest width measurement.
Next, measure the depth of the window well. This measurement is taken from the outside of the window frame to the outside edge of the window well, the furthest point away from the house. As with the width measurement, it is important to take multiple measurements to account for any variations in the depth. Record the largest depth measurement.
Finally, measure the height of the window well. This measurement is taken from the bottom of the well to the top edge. This measurement is particularly important if the cover is designed to be supported by the sides of the well. Record the height measurement.
After obtaining all the necessary measurements, document them clearly. When ordering a window well cover, always double-check that the measurements provided match the specifications of the cover. This can help prevent errors and ensure a proper fit.
Preparing the Window Well for Installation
Before installing the window well cover, it is crucial to prepare the window well itself. This involves cleaning the well, addressing any drainage issues, and making any necessary repairs. A well-prepared window well ensures that the cover functions effectively and provides long-lasting protection.
Begin by removing any debris from the window well. This may include leaves, dirt, rocks, insects, and other accumulated materials. Use a shovel, rake, or broom to remove larger debris. For smaller debris, a shop vacuum or a stiff brush can be used. Ensure that the bottom of the window well is clear of any obstructions that could impede drainage.
Next, inspect the window well for any drainage issues. Poor drainage can lead to water accumulation, which can damage the foundation of the house and create a breeding ground for mosquitoes. If there is standing water in the well, investigate the cause. Common causes of drainage problems include clogged drain pipes, compacted soil, or an improper slope. Correcting these issues may involve clearing the drain pipe, adding gravel to improve drainage, or re-grading the soil around the window well.
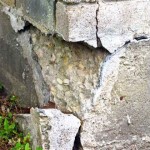
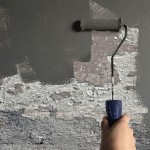
After addressing any drainage issues, inspect the window well for any damage. Cracks, chips, or other damage to the sides of the well can compromise its structural integrity. Repair any damage using appropriate materials, such as concrete patching compound or masonry sealant. Proper repairs ensure that the window well is structurally sound and can adequately support the cover.
Finally, consider applying a sealant to the window frame and the top edge of the window well. This can help prevent water from seeping into the basement and provide a better seal for the cover. Choose a sealant that is specifically designed for outdoor use and that is compatible with the materials of the window frame and the window well.
Installing the Window Well Cover
The actual installation process will vary depending on the type of window well cover chosen. However, the following steps provide a general outline of the installation process:
First, position the cover over the window well. Ensure that it is properly aligned and that it covers the entire opening. If the cover is designed to be supported by the sides of the well, make sure that it rests securely on the edges of the well.
Next, secure the cover to the window well. This may involve using screws, bolts, or clips. The specific method of attachment will depend on the design of the cover and the materials of the window well. Follow the manufacturer's instructions carefully to ensure a secure and proper installation.
For covers that are secured with screws or bolts, use a drill to create pilot holes in the window well. The pilot holes should be slightly smaller than the diameter of the screws or bolts. This will help prevent the window well from cracking or splitting when the screws or bolts are tightened.
For covers that are secured with clips, ensure that the clips are properly engaged and that they hold the cover firmly in place. Test the cover to ensure that it is securely attached and that it cannot be easily dislodged.
After the cover is securely attached, inspect it for any gaps or openings. Seal any gaps or openings with caulk or weather stripping. This will help prevent water, insects, and debris from entering the window well.
If the window well cover is equipped with hinges or latches, test them to ensure that they function properly. Lubricate any hinges or latches as needed to ensure smooth operation.
Once the cover is installed, inspect it regularly for any signs of damage or wear. Repair any damage promptly to prevent further deterioration. Clean the cover periodically to remove any accumulated debris.
In many cases, window well covers are attached via anchors. These anchors are typically screwed into the foundation wall surrounding the window well. The cover itself is then attached to these anchors, creating a secure and stable barrier.
When choosing anchors, consider the type of material of the foundation wall. Concrete requires different anchors than brick or wood. Using the wrong type of anchor can lead to a weak connection and potential failure.
Before drilling any holes for the anchors, carefully mark the locations. Use a level to ensure that the anchors are aligned properly. Misaligned anchors can make it difficult to attach the cover and can compromise its stability.
Drill the pilot holes for the anchors according to the manufacturer's instructions. Be sure to use the correct size drill bit. Too small of a hole can make it difficult to insert the anchors, while too large of a hole can result in a loose connection.
Insert the anchors into the pilot holes and tighten them securely. Be careful not to overtighten them, as this can damage the foundation wall or the anchors themselves.
Finally, attach the window well cover to the anchors. Ensure that the cover is properly aligned and that it is securely fastened to the anchors. Test the cover to ensure that it is stable and that it cannot be easily removed.
By following these steps carefully, a homeowner can successfully install basement window well covers. This simple home improvement project can improve the safety, energy efficiency, and overall value of a home.

Why Diy Window Well Covers Are Never A Good Idea Experts By Bubble

Custom Window Well Covers Egress Plexiglas Masonry Metal The Bubble

Window Well Covers For Masonry And Wood Wells

5 Diy Window Well Covers

How To Install A Terraced Window Well In Your Basement Diy

Egress Window Well Covers Experts By Bubble

Installing A Window Well Guard Youtube

5 Diy Window Well Covers

Homemade Window Well Covers Cover Basement

Window Well Covers Types Materials Advantages And Disadvantages