How To Finish A Basement Around Sump Pump Pits
Finishing a basement is a great way to add living space to your home, but it's crucial to consider the sump pump pit. These pits are essential for managing water infiltration, and finishing around them requires careful planning and execution to ensure both functionality and aesthetics. This article will guide you through the steps of effectively finishing your basement around a sump pump pit, ensuring both protection from water damage and a seamless, finished look.
1. Planning and Preparation
Before starting any work, proper planning and preparation are vital. This includes:
- Assessing the Sump Pump Pit: Evaluate the size and condition of the pit. Ensure the sump pump itself is functioning properly and the pit is adequately sized to handle anticipated water volume.
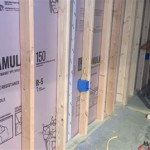
- Determining the Finishing Material: Choose a material that is moisture-resistant and appropriate for your basement's overall design. Options include drywall (with proper moisture-resistant treatments), concrete board, or waterproof paneling.
- Planning the Layout: Designate space around the pit for easy access to the sump pump and its components. This might involve building a small platform or leaving adequate clearance for maintenance.
- Gathering Necessary Materials: Collect all the necessary materials, including framing lumber, insulation, vapor barrier, finishing material, and any required hardware.
2. Framing and Insulation
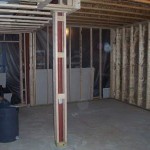
Once the planning is complete, you can begin framing and insulating around the sump pump pit. This step ensures structural support and minimizes heat loss:
- Framing: Construct a frame around the pit using pressure-treated lumber, which is resistant to moisture damage. Ensure the frame is level and plumb, and provide adequate support for the finishing material.
- Insulation: Install insulation within the framed area. Choose a moisture-resistant type of insulation, such as fiberglass batts or rigid foam board. This will help prevent condensation and improve the overall comfort of the finished basement.
- Vapor Barrier: Apply a vapor barrier to the interior side of the framing. This will prevent moisture from migrating from the concrete basement floor into the finished space.
3. Finishing the Area
The final step involves installing the chosen finishing material around the sump pump pit. This requires careful attention to detail and appropriate installation techniques:
- Drywall: If using drywall, select moisture-resistant (greenboard) drywall. Apply a sealant to the seams and screw the drywall securely to the frame. Use a moisture-resistant tape and compound to finish the seams.
- Concrete Board: Concrete board is a durable option, especially in areas prone to moisture. Install it with screws and sealant. Apply a moisture-resistant primer and paint for a finished look.
- Waterproof Paneling: This is a quick and easy option, but it may not be as aesthetically pleasing as other choices. Install the panels according to the manufacturer's instructions, ensuring proper sealing and moisture resistance.
- Painting: Choose a moisture-resistant paint to finish the walls. Select colors that match the rest of your basement design.
- Lighting: Install appropriate lighting around the sump pump pit to ensure visibility and facilitate maintenance.
- Flooring: Choose a basement-friendly flooring option like tile, laminate, or concrete. Avoid using wood flooring in areas that may be susceptible to moisture.
Remember to leave an access door or panel in the finished area around the sump pump pit. This will allow for easy access to the pump for maintenance and repairs.
4. Finishing Touches
After installing the chosen finishing material, you can add finishing touches to enhance the appearance and functionality of the space:
By following these steps, you can effectively finish your basement around a sump pump pit, maintaining its functionality while creating a finished and aesthetically pleasing space. Remember, proper planning, the use of suitable materials, and a meticulous approach to installation will ensure both a protected and visually attractive basement.

Need To Cover Your Sump Pump 5 Great Ideas That Work 1 Tom Plumber

Clever Sump Pump Cover Ideas Basements Plus

Sump Pump Cover Hardwood Floor

How To Hide Your Sump Pump Hole

Do You Need A Sump Pump In Finished Basement

Need To Cover Your Sump Pump 5 Great Ideas That Work 1 Tom Plumber

Sump Pump Installation How To Install A

Diy Sump Pump Install Your Own Smd Fluid Controls

Basement Framing Rough In Plumbing And Sump Pit Home Improvement Stack Exchange

3 Reasons To Hire A Waterproofer And Not Plumber For Sump Pump Repair News Events Basement Systems Inc
Related Posts