DIY Basement Perimeter Drain: A Comprehensive Guide
Water intrusion in a basement can lead to a multitude of problems, including structural damage, mold growth, and loss of usable space. A perimeter drain, also known as a French drain, is a common solution to redirect groundwater away from the foundation walls and prevent water from accumulating in the basement. While professional installation is an option, a homeowner with adequate skills and dedication can install a basement perimeter drain as a do-it-yourself (DIY) project. This article outlines the process, considerations, and best practices for a successful DIY basement perimeter drain installation.
Before embarking on this project, it's crucial to assess the severity of the water problem and the overall structural integrity of the foundation. Significant cracking or bowing of the foundation walls may indicate a more serious issue requiring professional attention. It is also advisable to consult local building codes and regulations to ensure compliance with all necessary permits and guidelines. Understanding the soil composition around the foundation is also essential. Sandy soil allows for easier drainage than clay-heavy soil, which may require additional measures to facilitate water flow. A soil test can provide valuable insight into the soil's permeability.
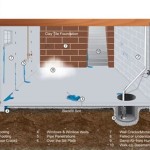
The fundamental principle of a perimeter drain is to create a pathway for groundwater to flow away from the foundation and towards a designated discharge point, typically a sump pump. The drain consists of a perforated pipe surrounded by gravel, which acts as a filter and allows water to enter the pipe. The pipe is then sloped to ensure gravity-driven drainage towards the sump pump, which then expels the water away from the house.
Planning and Preparation
The initial stage of any DIY project is meticulous planning. For a DIY basement perimeter drain, this involves assessing the existing basement layout, identifying the source of water intrusion (if possible), and charting a course for the drain system. Precise measurements of the basement perimeter are necessary to determine the amount of piping, gravel, and other materials required. Consider the location of utilities, such as gas lines, electrical conduits, and plumbing, to avoid damage during excavation. Marking the positions of these utilities is critical for safety.
Selecting the appropriate type of piping is also a key consideration. Corrugated, perforated pipes are commonly used, but smooth-walled PVC pipes offer better flow rates and resistance to clogging. The diameter of the pipe should be adequate to handle the anticipated water volume. Typically, a 4-inch diameter pipe is sufficient for most residential applications. The type of gravel used is also important. Washed gravel, free from fine particles, is preferred to prevent clogging of the drain pipe. The gravel should be of a size that allows for efficient water flow while filtering out sediment.
The sump pump selection is equally critical. The pump's capacity, measured in gallons per minute (GPM), should be sufficient to handle the anticipated water inflow. Factors such as the depth of the basement, the distance to the discharge point, and the average rainfall in the area should be considered when selecting a sump pump. A battery backup sump pump is also a wise investment, as it provides protection during power outages, which often coincide with heavy rainfall events.
Gathering the necessary tools and materials is essential before commencing the excavation. Tools required include a jackhammer (for breaking concrete), a shovel, a pickaxe, a wheelbarrow, a level, safety glasses, work gloves, and a respirator mask. Materials required include perforated drain pipe, gravel, landscape fabric, sump pump, sump basin, discharge pipe, concrete mix, and sealant.
Excavation and Drain Installation
The excavation process is the most physically demanding part of the project. The perimeter of the basement floor needs to be broken and removed to create a trench. The width of the trench should be sufficient to accommodate the drain pipe and a surrounding layer of gravel. A typical trench width is approximately 12 inches. The depth of the trench should be below the level of the basement floor to effectively intercept groundwater. The depth will vary depending on the specific conditions, but a depth of 6 to 12 inches below the floor is generally adequate.
When breaking the concrete, exercise caution to avoid damaging the foundation walls or underlying utilities. Use a jackhammer or a concrete saw to score the concrete along the perimeter before breaking it into manageable pieces. Dispose of the concrete debris properly, adhering to local regulations. After removing the concrete, excavate the soil to the desired depth, ensuring a consistent slope towards the sump pump location. The slope should be at least 1/8 inch per foot to ensure proper drainage.
Once the trench is excavated, line it with landscape fabric. This fabric acts as a filter, preventing soil particles from entering the gravel and clogging the drain. Overlap the fabric edges to ensure complete coverage. Then, pour a layer of gravel into the trench, creating a bed for the drain pipe. The gravel layer should be approximately 2 to 3 inches thick. Place the perforated drain pipe on top of the gravel bed, ensuring that the perforations face downwards to allow water to enter the pipe from below. Connect the drain pipe sections using appropriate fittings, ensuring a watertight seal.
Cover the drain pipe with another layer of gravel, completely encasing the pipe. This gravel layer should be at least 6 inches thick. Fold the landscape fabric over the gravel to enclose the drain system, further preventing soil infiltration. Backfill the remaining space in the trench with concrete mix, ensuring that the concrete is level with the existing basement floor. Smooth the concrete surface and allow it to cure according to the manufacturer's instructions.
The sump pump installation involves setting the sump basin in a designated location, typically the lowest point in the basement. Connect the drain pipe to the sump basin, ensuring a secure and watertight connection. Place the sump pump inside the basin and connect the discharge pipe. The discharge pipe should be routed away from the foundation, preferably to a storm sewer or a designated drainage area. Check local regulations regarding sump pump discharge requirements. Ensure that the sump pump is properly grounded and connected to a dedicated electrical circuit.
Addressing Specific Challenges
Several challenges can arise during a DIY basement perimeter drain installation. One common issue is encountering unexpected obstacles, such as buried utilities or large rocks. If a utility line is encountered, immediately stop excavation and contact the appropriate utility company to locate and mark the line. Do not attempt to move or alter the utility line yourself. If large rocks are encountered, they may need to be broken or removed to ensure a consistent trench depth and slope. Another challenge is dealing with excessive groundwater. If the excavation fills with water, a temporary pump may be needed to keep the trench dry during installation.
Another challenge is dealing with existing foundation walls that are not perfectly vertical. In this case, ensure that the drain is installed as close to the wall as possible to intercept water seeping through the foundation. If there are cracks or voids in the foundation wall, consider repairing these before installing the drain. Use a hydraulic cement or epoxy sealant to fill the cracks and prevent water intrusion. Proper sealing is crucial for a successful perimeter drain system.
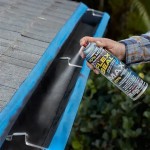
Proper grading and landscaping around the foundation exterior is crucial to minimizing water intrusion at the source. Ensure that the ground slopes away from the foundation to direct rainwater away from the building. Install gutters and downspouts to collect rainwater and discharge it away from the foundation. Consider installing a French drain system on the exterior of the foundation as well. This can further reduce the amount of water reaching the basement.
Post-Installation Considerations and Maintenance
After completing the DIY basement perimeter drain installation, it is crucial to monitor the system's performance and address any issues promptly. Regularly inspect the sump pump to ensure it is functioning correctly. Check the discharge pipe for obstructions and clear any debris that may be clogging the pipe. Periodically clean the sump basin to remove sediment and prevent pump malfunction. Consider installing a sump pump alarm or monitor to provide early warning of pump failure. A properly maintained perimeter drain system can provide years of reliable protection against basement water intrusion.
It is also essential to observe the basement walls for any signs of dampness or water intrusion. If water is still seeping through the walls, further investigation may be necessary to identify the source and implement additional solutions. This could involve sealing cracks in the foundation, improving exterior drainage, or installing a vapor barrier on the interior walls. Remember, a DIY basement perimeter drain is a complex project that requires careful planning, execution, and maintenance. However, with proper preparation and attention to detail, it can be an effective solution for preventing basement water problems.
Key Points Recap
To recap, a successful DIY basement perimeter drain hinges on a few important factors:
Comprehensive Planning and Preparation:
This involves assessing the water problem, understanding local codes, selecting appropriate materials, and gathering necessary tools. A detailed plan minimizes unforeseen challenges and ensures a smoother installation process.
Proper Excavation and Installation Techniques:
This includes accurately excavating the trench, installing the drain pipe with adequate slope, encasing it in gravel and landscape fabric, and carefully backfilling with concrete. Attention to detail during this phase is crucial for the system's effectiveness.
Ongoing Maintenance and Monitoring:
Regularly inspecting and maintaining the sump pump, cleaning the basin, and monitoring the basement walls for signs of dampness are essential for long-term performance and preventing future water problems.
By adhering to these principles, a homeowner can successfully install a DIY basement perimeter drain and protect their home from the damaging effects of water intrusion. Remember that safety precautions should be taken at all times during the project, and seeking professional advice for complex situations is always recommended.

Basement Drainage Drying A Wet Diy Family Handyman

How To Do A Interior Perimeter Drain Youtube

Interior Drainage System For Diy Basement Waterproofing Youtube

Drain Pipe Installation Install A Warranted Basement System In Your Home

Basement Drains 101 A Simple Guide For Busy Homeowners

Wet Basement Solutions Installing An Interior Drainage System Youtube

Basement Waterproofing How To Install A Water Drainage System Diy

Diy Basement Waterproofing Sealonce System Easy Installation Waterproof Com

A Quick Guide To French Drain Basement Waterproofing

What Is The Best Water Drainage For Your Basement Acculevel
Related Posts