Best Way to Paint Basement Cement Walls
Painting basement cement walls can significantly improve the aesthetics and functionality of a basement space. A fresh coat of paint can brighten a potentially drab area, protect the cement from moisture damage, and even help to insulate the room. However, successful painting requires careful preparation, the right materials, and a proper understanding of the unique challenges posed by cement surfaces. This article provides a comprehensive guide to achieving a professional and long-lasting paint job on basement cement walls.
Preparing the Cement Walls for Painting
Proper preparation is arguably the most critical step in painting basement cement walls. Cement is a porous material that can absorb moisture and contain contaminants. If the surface is not correctly prepared, the paint may not adhere properly, leading to peeling, blistering, or mold growth. The preparation process involves cleaning, repairing, and priming the walls.
The first step is a thorough cleaning. Use a stiff brush and a solution of water and trisodium phosphate (TSP) to scrub the walls. TSP is an effective cleaner for removing dirt, grime, mildew, and efflorescence, a white, powdery salt deposit that often forms on cement surfaces. Always follow the manufacturer's instructions for dilution and safety precautions when using TSP, including wearing gloves and eye protection. For stubborn stains or mildew, a stronger solution may be necessary. After scrubbing, rinse the walls thoroughly with clean water and allow them to dry completely. This drying process can take several days, depending on the humidity and ventilation.
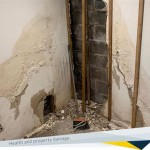
Once the walls are clean and dry, inspect them for cracks, holes, or other imperfections. Small cracks can be filled with a concrete patching compound or hydraulic cement. Hydraulic cement is particularly effective for repairing cracks that are actively leaking water, as it expands as it hardens, creating a watertight seal. Larger cracks or holes may require more extensive repair, potentially involving the application of mortar or the reinforcement of the underlying structure. Allow the patching compound or cement to cure completely according to the manufacturer's instructions before proceeding.
Efflorescence is a common problem in basements and must be addressed during preparation. If TSP and scrubbing do not remove it, a muriatic acid solution specifically formulated for efflorescence removal may be necessary. Exercise extreme caution when using muriatic acid, as it is a corrosive substance. Wear appropriate protective gear, including gloves, eye protection, and a respirator. Carefully follow the manufacturer's instructions for dilution and application. After applying the acid solution, rinse the walls thoroughly with clean water to neutralize any remaining residue. Allow the walls to dry completely before moving on to the next step.
After cleaning and repairing the cement walls, priming is essential. Primer creates a uniform surface for the paint to adhere to, seals the pores of the cement, and helps to prevent moisture from seeping through the walls. Use a high-quality alkali-resistant primer specifically designed for cement or concrete. Apply the primer evenly using a roller or brush, following the manufacturer's instructions for coverage and drying time. In some cases, two coats of primer may be necessary, especially if the cement is very porous or has a history of moisture problems. Ensure the primer is completely dry before applying the paint.
Selecting the Right Paint and Equipment
Choosing the appropriate paint and equipment is crucial for achieving a durable and aesthetically pleasing finish. Not all paints are suitable for basement cement walls. Selecting the wrong type of paint can lead to problems such as peeling, blistering, and mold growth. Using the proper equipment can also impact the final result and efficiency of the painting process.
For basement cement walls, use a high-quality waterproof paint specifically formulated for masonry. These paints are typically acrylic-latex based and contain additives that resist moisture, mildew, and efflorescence. Epoxy paints are also an option, offering excellent durability and water resistance. However, epoxy paints are more expensive and require careful preparation and application. Read the paint label carefully to ensure it is suitable for basement cement walls and follow the manufacturer's instructions for application. Breathable paints are generally preferred as they allow moisture vapor to escape, reducing the risk of blistering.
In addition to the right type of paint, color selection is important. Lighter colors are generally recommended for basements, as they reflect more light and can make the space feel brighter and more open. White, off-white, and light pastel shades are popular choices. However, the color choice ultimately depends on personal preference and the desired aesthetic. Consider the existing lighting in the basement and how the color will look under those conditions. Always test a small, inconspicuous area before painting the entire wall to ensure the color is satisfactory.
The equipment needed for painting basement cement walls includes paint rollers, brushes, paint trays, extension poles, and drop cloths. Use a roller with a nap length appropriate for the texture of the cement walls. A longer nap is better for rough or uneven surfaces, while a shorter nap is suitable for smoother surfaces. High-quality brushes are essential for cutting in edges and painting corners. An extension pole can make it easier to reach high areas without using a ladder. Drop cloths are crucial for protecting the floor and furniture from paint splatters. Painter's tape can be used to mask off trim, windows, and other areas that should not be painted.
Safety is also paramount when painting in a basement. Ensure adequate ventilation by opening windows and using fans to circulate air. Wear a respirator to protect against paint fumes, especially when using oil-based paints or epoxy coatings. Gloves and eye protection are also recommended to prevent skin and eye irritation. If using a ladder, make sure it is stable and secure to prevent falls. Follow all safety precautions listed on the paint and primer labels.
Applying the Paint for a Lasting Finish
The application of paint is the final stage of the process and significantly impacts the durability and appearance of the finished product. Proper application techniques ensure that the paint adheres well to the surface, provides adequate coverage, and creates a smooth, uniform finish. Rushing or neglecting this step can compromise the entire paint job.
Begin by cutting in the edges and corners of the walls with a brush. This involves painting a narrow strip along the edges of the wall where it meets the ceiling, floor, trim, or other surfaces. Cutting in creates a clean, defined line and ensures that the roller can reach all areas of the wall. Apply the paint in thin, even coats to avoid drips and runs. Overlapping the brushstrokes slightly will help to blend the paint and create a seamless finish.
Next, use a roller to paint the main surface of the walls. Load the roller with paint evenly and apply it to the wall in a "W" or "M" pattern. This technique helps to distribute the paint evenly and prevents creating thin or thick spots. Overlap each stroke slightly to ensure complete coverage. Avoid applying too much pressure to the roller, as this can cause the paint to splatter. Work in manageable sections, typically about 4 feet by 4 feet, to maintain control and prevent the paint from drying unevenly.
Allow the first coat of paint to dry completely before applying a second coat. The drying time will depend on the type of paint, the humidity, and the temperature. Refer to the manufacturer's instructions for the recommended drying time. A second coat is usually necessary to achieve full coverage and a uniform color. Apply the second coat using the same techniques as the first, paying attention to any areas that may have been missed. Ensure the second coat is also completely dry before handling or placing any furniture against the walls.
After the final coat of paint has dried, inspect the walls for any imperfections, such as drips, runs, or thin spots. Touch up these areas with a small brush or roller. Remove any painter's tape carefully to avoid peeling off the paint. Clean up all painting equipment immediately after use. Wash brushes and rollers with soap and water, and dispose of paint cans and other waste materials properly. Allow the paint to cure fully, which can take several days, before placing any furniture or other items against the walls.
By following these detailed steps for preparation, material selection, and application, homeowners can successfully paint their basement cement walls, creating a brighter, more comfortable, and more protected space. This careful approach ensures a lasting and professional-looking result.

Painting Cinder Block Walls In A Basement Or Re Paint Them

Basement Finishing Do Not Paint Your Walls

6 Best Paints For Concrete Basement Walls

Best Paint For Concrete Walls In A Basement

Painting Cinder Block Walls In A Basement Or Re Paint Them

How To Easily Add Knockdown Texture Concrete Basement Walls

6 Best Paints For Concrete Basement Walls

How To Repaint Concrete Walls Island Paints
:strip_icc()/102522989-0a65e22401704c578a80668b4f86a695.jpg?strip=all "How To Paint Basement Walls")
How To Paint Basement Walls

10 Ways To Cover Concrete Walls In A Basement Finish
Related Posts