Adding A Room To An Unfinished Basement: A Comprehensive Guide
An unfinished basement presents a wealth of opportunity for homeowners seeking to expand their living space without the complexities and expense associated with traditional home additions. Transforming an unfinished basement into a functional room, whether it be a bedroom, home office, entertainment area, or playroom, can significantly increase a property's value and enhance its usability. However, this undertaking requires careful planning, adherence to building codes, and a thorough understanding of the various factors involved.
Before embarking on a basement finishing project, it is crucial to assess the existing conditions of the space. This assessment should include a detailed inspection of the foundation, moisture levels, and existing utilities. Identifying potential problems early on can prevent costly setbacks later in the construction process.
Initial Assessment and Planning
The first step in adding a room to an unfinished basement is a comprehensive assessment. This starts with a thorough inspection of the basement's structural integrity. Examine the foundation walls for cracks, bowing, or any signs of water damage. If any structural issues are present, it is imperative to consult with a structural engineer to determine the appropriate remediation measures before proceeding with any further construction.
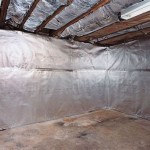
Moisture control is another critical aspect of the initial assessment. Basements are inherently prone to dampness due to their location below ground level. High humidity can lead to mold growth, which can pose health risks and damage building materials. Check for signs of water intrusion, such as water stains, efflorescence (a white, powdery deposit on concrete surfaces), and musty odors. If moisture problems are detected, address them before beginning any finishing work. This may involve installing a drainage system, applying a waterproof sealant to the foundation walls, or improving the ventilation in the basement.
Next, evaluate the existing utilities in the basement. Locate the electrical panel, plumbing lines, and HVAC system. Determine if these utilities will need to be relocated or modified to accommodate the new room. It is essential to plan the layout of the room in such a way that it does not obstruct access to these utilities for maintenance and repairs. Consider whether additional electrical outlets, plumbing fixtures, or HVAC vents will be required to meet the needs of the new space. Consult with licensed electricians and plumbers to ensure that all utility work is performed safely and in compliance with local codes.
Furthermore, consider the ceiling height of the basement. Many building codes require a minimum ceiling height for habitable spaces. If the ceiling height is insufficient, it may be necessary to lower the floor slab or raise the foundation, which can be a significant undertaking. Before making any changes to the floor or foundation, consult with a qualified contractor or engineer to ensure that the modifications will not compromise the structural integrity of the building.
Once the initial assessment is complete, develop a detailed plan for the new room. This plan should include a floor plan showing the layout of the walls, doors, windows, and fixtures. It should also specify the materials that will be used for the construction, such as framing lumber, insulation, drywall, flooring, and paint. Obtain all necessary permits from the local building department before starting any construction work. Failure to obtain the required permits can result in fines and delays.
Addressing Moisture and Insulation
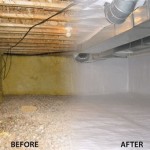
Controlling moisture and providing adequate insulation are paramount to creating a comfortable and energy-efficient basement room. Basement walls are in direct contact with the surrounding soil, which can transfer moisture into the interior space. Properly addressing moisture issues before finishing the basement is essential to prevent mold growth, wood rot, and other moisture-related problems.
One of the most effective ways to control moisture in a basement is to apply a waterproof sealant to the interior foundation walls. This sealant creates a barrier that prevents water from seeping through the concrete. It is important to choose a sealant that is specifically designed for use on concrete and that is resistant to both water and vapor transmission. Before applying the sealant, clean the walls thoroughly and repair any cracks or holes. Follow the manufacturer's instructions carefully to ensure proper application.
Another effective moisture control measure is to install a drainage system around the perimeter of the foundation. This system consists of a perforated pipe that is buried in gravel alongside the foundation wall. The pipe collects groundwater and channels it away from the foundation, preventing it from seeping into the basement. A sump pump may be required to pump the water away from the foundation if gravity drainage is not possible.
In addition to moisture control, insulation is essential for maintaining a comfortable temperature in the basement room and reducing energy costs. Basement walls and floors are typically colder than the walls and floors above ground, so proper insulation is crucial for preventing heat loss. There are several types of insulation that can be used in basements, including rigid foam insulation, fiberglass batts, and spray foam insulation.
Rigid foam insulation is an excellent choice for basement walls because it is resistant to moisture and provides a high R-value (a measure of thermal resistance). It can be installed directly against the foundation wall and then covered with drywall. Fiberglass batts are another option for insulating basement walls, but they must be protected from moisture by a vapor barrier. Spray foam insulation is a more expensive option, but it provides excellent insulation and air sealing. It can be sprayed directly onto the foundation walls and then covered with drywall.
Insulating the basement floor can also help to improve comfort and reduce energy costs. This can be done by installing rigid foam insulation under the finished flooring. Another option is to install a subfloor system that incorporates insulation. These systems typically consist of interlocking panels that create a thermal break between the concrete floor and the finished flooring.
Framing and Finishing the Space
Once the moisture control and insulation measures are in place, the next step is to frame the walls and finish the space. This involves building the wall studs, installing the electrical wiring and plumbing, and putting up the drywall. Careful attention to detail is essential to ensure a professional and aesthetically pleasing finished product.
When framing the walls, use pressure-treated lumber for the bottom plates (the horizontal boards that sit on the floor). Pressure-treated lumber is resistant to rot and insect damage, which can be important in a basement environment. Secure the bottom plates to the concrete floor using concrete anchors. The wall studs should be spaced 16 inches on center (meaning that the distance between the center of each stud is 16 inches). This spacing provides adequate support for the drywall. Use a level to ensure that the walls are plumb (perfectly vertical) and square.
Before installing the drywall, run all the necessary electrical wiring and plumbing. Install electrical outlets, switches, and light fixtures according to the electrical code. Install plumbing lines for any sinks, toilets, or showers that will be located in the room. It is important to have all electrical and plumbing work inspected by a qualified inspector to ensure that it is done correctly and safely.
Once the electrical and plumbing work is complete, install the drywall. Use drywall screws to attach the drywall to the wall studs. Tape and mud the seams to create a smooth, seamless surface. Sand the mud smooth before priming and painting the walls. Choose a paint that is specifically designed for use in basements. These paints are typically resistant to moisture and mildew.
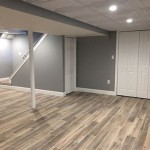
Finally, install the flooring, trim, and any other finishing touches. Choose a flooring material that is appropriate for a basement environment. Some popular options include laminate flooring, vinyl flooring, and carpet tiles. Install baseboards, door casings, and window trim to complete the look of the room. Consider adding recessed lighting, decorative fixtures, and artwork to create a comfortable and inviting space.
Transforming an unfinished basement into a usable room requires meticulous planning, thorough execution, and adherence to building codes. By carefully addressing moisture issues, providing adequate insulation, and framing and finishing the space with attention to detail, homeowners can create a valuable addition to their property that enhances their living experience.

How To Add A Bedroom In Basement From Scratch Framing Adding Window Electrical Drywall Youtube

Awesome Unfinished Basement Before And After Building Bluebird

I Gained A Bedroom Remodelando La Casa

Tips For Converting Unfinished Basement To Bedrooms And What Avoid One Man A Toolbox

11 Affordable Unfinished Basement Ideas To Diy Building Bluebird

How To Create A Playroom In An Unfinished Basement

Discover The Hidden Value In An Unfinished Basement Miller Family Homes

Does Adding A Bedroom In The Basement Add Value Angi

I Gained A Bedroom Remodelando La Casa

18 Ideas To Make Your Unfinished Basement More Welcoming
Related Posts