DIY Basement Window Well Covers: Protecting Your Home's Foundation
Basement window wells provide essential light and ventilation to subterranean spaces. However, they also present potential problems, including the accumulation of rainwater, debris, and even the entry of small animals. These issues can lead to moisture damage, pest infestations, and reduced energy efficiency. Therefore, constructing DIY basement window well covers is a practical and cost-effective solution for homeowners.
This article outlines the benefits of window well covers, steps for measuring and designing a suitable cover, the materials required, and a detailed guide to constructing durable and aesthetically pleasing DIY basement window well covers. The process, although requiring some basic carpentry skills, is manageable for most homeowners and offers significant long-term protection for the home's foundation.
Why Install Basement Window Well Covers?
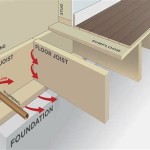
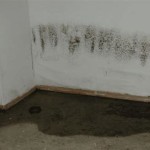
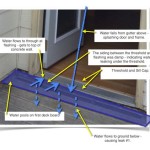
The primary reason for installing window well covers is to prevent water from accumulating in the wells. Rainwater, snowmelt, and even excessive humidity can seep into the basement through ill-protected window wells, leading to dampness, mold growth, and potential structural damage. By providing a barrier against the elements, window well covers significantly reduce the risk of water intrusion. Furthermore, covers prevent the build-up of leaves, dirt, and other debris, which can clog drainage systems and exacerbate moisture problems.
Beyond water protection, window well covers also serve as a deterrent to pests. Open window wells provide easy access for insects, rodents, and small animals to enter the basement. A properly constructed cover creates a physical barrier, preventing these unwanted guests from infiltrating the home. This is particularly vital in areas with high rodent or insect populations, as it can substantially reduce the need for pest control measures.
Finally, window well covers can enhance home security. While not impenetrable, they add an extra layer of security, making it more challenging for potential intruders to access the basement through the window wells. This is especially relevant for ground-level or partially submerged basements, where window wells can be a vulnerable entry point.
Measuring and Designing Your Window Well Cover
Accurate measurement is crucial for ensuring a proper fit and optimal performance of the window well cover. Begin by measuring the length and width of the window well, taking measurements at the top, middle, and bottom to account for any variations in shape. If the well is not perfectly rectangular, make measurements at the widest and longest points. The depth of the well is also important, as it will dictate the height of the cover's frame.
Next, consider the type of cover that best suits the needs and aesthetic preferences. A flat cover is the simplest design and is suitable for wells that are not exceptionally deep. A dome-shaped cover, on the other hand, provides more clearance and is ideal for deeper wells or wells with protruding window hardware. A sloped cover can effectively shed water and snow, preventing accumulation on the surface.
When designing the cover, also consider the materials to be used. Common materials include wood, metal, and polycarbonate sheets. Wood is a relatively inexpensive option, but it requires regular maintenance to prevent rot and decay. Metal, such as aluminum or steel, is more durable but can be more expensive and challenging to work with. Polycarbonate sheets are lightweight, transparent, and resistant to impact, making them an excellent choice for the cover's surface. The frame can be made from wood or metal, depending on the desired strength and durability.
Furthermore, the design should incorporate adequate ventilation. While the primary purpose of the cover is to keep water and debris out, it is also important to allow airflow to prevent moisture build-up inside the well. This can be achieved by incorporating small vents or gaps in the cover's surface.
Materials and Tools Required for Construction
The materials needed for building a DIY window well cover depend on the chosen design and materials. For a basic wooden frame cover with a polycarbonate sheet, the following materials are essential:
*Pressure-treated lumber: Choose lumber that is specifically treated for outdoor use to resist rot and insect damage. The dimensions will depend on the size of the window well, but 2x4 lumber is commonly used for the frame.
*Polycarbonate sheet: Select a thickness that provides sufficient strength and durability. A thickness of 1/8 inch to 1/4 inch is generally adequate.
*Screws: Use stainless steel or galvanized screws to prevent rust. Choose screws of appropriate length for joining the frame members and attaching the polycarbonate sheet.
*Wood glue: Waterproof wood glue will enhance the strength and durability of the frame joints.
*Ventilation screen (optional): If adding vents, purchase a suitable screen material to prevent insects from entering.
*Paint or stain (optional): To protect the wooden frame and enhance its appearance, choose an exterior-grade paint or stain.
In addition to these materials, the following tools will be required:
*Measuring tape: For accurate measurements of the window well and materials.
*Saw: A circular saw or miter saw is ideal for cutting the lumber to size.
*Drill: For pre-drilling holes and driving screws.
*Screwdriver: To manually tighten screws.
*Clamps: To hold the frame members together while the glue dries.
*Safety glasses and gloves: For personal protection during construction.
*Pencil: For marking measurements and cut lines.
*Sandpaper: For smoothing rough edges and surfaces.
*Caulk gun and exterior-grade caulk: to seal the edge of the polycarbonate to the frame.
Step-by-Step Guide to Building a Wooden Frame Window Well Cover
The following steps outline the construction of a basic wooden frame window well cover with a polycarbonate sheet. This design is relatively simple and can be adapted to fit various window well sizes and shapes.
Step 1: Cut the Frame Members
Using the measurements taken earlier, cut the pressure-treated lumber to the appropriate lengths to create the frame. Ensure that the corners will create a snug fit around the window well. For a rectangular well, cut two longer pieces for the length and two shorter pieces for the width. Use a miter saw to cut the ends of the lumber at a 45-degree angle for a neat and professional-looking corner joint. If a miter saw is not available, butt joints can be used, but they may be less aesthetically pleasing.
Step 2: Assemble the Frame
Apply waterproof wood glue to the mitered ends of the frame members. Join the pieces together to form the frame, ensuring that the corners are square. Use clamps to hold the frame together while the glue dries. Allow the glue to dry completely, typically for at least 24 hours. Once the glue has dried, reinforce the corners with screws. Pre-drill pilot holes to prevent the wood from splitting. Drive the screws into the corners at an angle for maximum strength.
Step 3: Prepare the Polycarbonate Sheet
Measure the inside dimensions of the frame. Cut the polycarbonate sheet to match these dimensions, allowing for a slight overlap around the edges. A utility knife or a fine-toothed saw can be used to cut the polycarbonate. Be sure to wear safety glasses to protect the eyes from flying debris. Smooth the edges of the polycarbonate sheet with sandpaper to remove any sharp edges.
Step 4: Attach the Polycarbonate Sheet to the Frame
Place the polycarbonate sheet on top of the wooden frame, ensuring that it is centered. Pre-drill pilot holes through the polycarbonate sheet and into the frame. Space the pilot holes evenly around the perimeter of the sheet. Use screws to attach the polycarbonate sheet to the frame. Do not overtighten the screws, as this can crack the polycarbonate. Apply exterior-grade caulk around the edges of the polycarbonate where it meets the frame to create a watertight seal.
Step 5: Add Ventilation (Optional)
If desired, add ventilation holes to the cover to allow for airflow. Drill small holes in the wooden frame or polycarbonate sheet. Cover the holes with ventilation screen to prevent insects from entering. Secure the screen to the frame with staples or small screws.
Step 6: Finish the Cover (Optional)
Protect the wooden frame by applying an exterior-grade paint or stain. This will help to prevent rot and decay. Allow the paint or stain to dry completely before installing the cover.
Step 7: Install the Cover
Carefully place the finished window well cover over the window well. Ensure that it fits snugly and securely. If necessary, add additional support to the cover to prevent it from sagging or collapsing. This can be achieved by placing bricks or wooden blocks underneath the cover. Consider using clips or other fastening mechanisms to secure the cover to the window well wall, especially in areas prone to high winds.
By following these steps, homeowners can construct durable and effective DIY basement window well covers that protect their homes from water damage, pests, and security risks. While modifications may be necessary based on the specific dimensions and characteristics of each window well, the core principles remain the same: accurate measurement, careful construction, and the use of appropriate materials.

Custom Window Well Covers Egress Plexiglas Masonry Metal The Bubble

Homemade Window Well Covers Cover Basement

Masonry And Wood Window Wells Well Covers Bubble

5 Diy Window Well Covers

5 Diy Window Well Covers

Build And Design Your Own Custom Egress Window Cover Well Covers

Why Diy Window Well Covers Are Never A Good Idea Experts By Bubble

Diy Window Well Cover For Under 100 Daniels Youtube

8 Easy To Make Diy Window Well Cover Ideas Egress Basement

Egress Window Well Covers Experts By Bubble
Related Posts